

How To Make Animated Gif With Gimp From Video
Text and images Copyright (C) 2002 Jakub Steiner and may non be used without permission of the author.
Intention
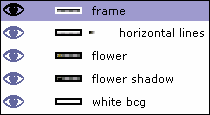
In this tutorial, you'll acquire how to use GIMP's layers in a different manner. Unlike information technology'south default composite role, using GIMP as an animation package requires you to recall of every layer as of an blitheness frame. We'll talk over the two dissimilar frame disposal methods afterwards on. For now allow us retrieve about every layer as of a separate frame.
Step 1
We'll create a very simple web banner. Let's start with a new image 468x60 px. Use white as the background color. Create new transparent layer. Select the whole image with Ctrl+A and fill it with blackness (Ctrl+,). Shrink the choice by i px (Option → compress) and delete the selection with Ctrl+K. We created a 1 px frame around out banner.
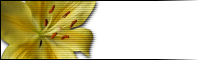
Now it's time to put our logo or the main theme picture into the banner. I have prepared a masked-out flower you meet on the picture on the left. I just pasted the blossom beneath the border frame, used alpha to option, created an empty layer below it and filled the selection with blackness using Ctrl+,. After that I blurred the shadow using Gaussian blur RLE and offset it by 2px to bottom correct. I couldn't resist adding the interlace effect using Filters → Render → Grid and a layer mask. In that layer mask i applied a b/w slope, so that the left of the flower is not interlaced.
This function of the tutorial is not the cardinal element, so feel complimentary to experiment. Once yous're ready flatten the epitome using the Epitome → Flatten Prototype.
Pace 2
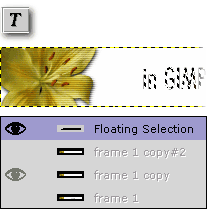
Now we're set up for the actual animation piece of work. We will be creating a banner consisting of, say three lines of text being animated. Each frame will consist of the flower prototype and accompanied by some text. I don't want to make this tedious, so lets make information technology three frames. The first stride volition naturally be to copy our flattened image 2 times using the duplicate layer push in the layers window.
Then we'll utilize the standard text tool to put a pocket-sized text note on every frame. Subsequently typing the text onto the frame, GIMP will create a floating selection, that you need to position right using the move tool and anchor using Ctrl+H. The positioning might be crucial for the final animation, so you tin can use the following trick to make the positioning a slice of cake. Before using the text tool, set the layer (frame) transparency to a lower value, so you could see the layer below it. That way yous can position the newly created text acording to the text below (on the previous frame).
Stride three

In every GIF animation you are allowed to specify the delay between frames. That way y'all tin can create a 12 second animation using simply a few frames, considering the delay does not accept to be constant. In GIMP you specify the delay every bit a layer comment. Just double-click the layer comment in the layers' window and a delay in ms enclosed in brackets ().
To check if the timing is skilful, you can preview the animation using the Filters → Blitheness → Animation Playback. Yous tin even drag the preview around your desktop.
Step 4
In the terminal stride, nosotros'll apply a very handy function for applying a filter to multiple layers. This function is provided by GAP, the GIMP Animation Parcel. Please go to the "Using GAP" tutorial to learn more about the tool.
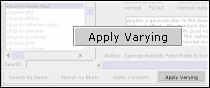
Before we can apply this effect, nosotros need to create a new image out of the tertiary frame. This is as unproblematic equally dragging the layer preview from the layers window to the toolbar. At present duplicate the image 4 times. With a rectangular select tool, draw a selction around the text. At present we're ready to utilise a gaussian mistiness filter on every layer using varying parameters. Utilise the Filters → Filter All Layers office and select plug-in-gauss-rle2 from the listing and press the use varying button. The blur dialog pops up. Now nosotros need to specify parameters for the lowest layer in the stack, ie. our first frame.
We want to mistiness the text abroad in fourth dimension, so for the showtime frame, let'southward specify a lower value. We'll blur in horizontal direction but, so let's get in v:0 h:2. After you lot click OK some other dialog shows upward. Here, choose go along and specify parameters for the concluding frame. We'll go for xx px horizontal mistiness. You can backup the progress, but for now we will make the filter utilize on all layers inbetween past clicking on go along in the next dialog. All we need to practise now is to drag the layers back to the original image.
Step 5
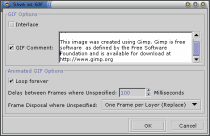
At present we only need to save our blitheness as GIF. Before we do that, let'south optimize the blitheness using the Filters → Animation → Blitheness Optimize role. This will create a new image using a different way than what we have at present. Yous can employ two different modes for every frame of your animation. You can either use the replace style (default), which will supercede the old frame with the new i. It's like taking the frame out before calculation a new one. The other is the combine method, in which the new frame is added to the previous frame. That manner only changes demand to exist updated. That'due south what blitheness optimize basically does. The file size gets tremendously smaller. Now we need to index the image using Image→ Way → Indexed function (Alt+I).
Try to use as little colors as possible and avoid dithering. Both number of colors and dithering tend to enlarge the filesize dramaticaly. I used no color dithering and generated 32 colour pallette. The file size of the banner is near 7kB. If you at present save the image every bit GIF, GIMP will inquire whether it should salve the image every bit an animation, which is exactly what we need. In the save equally GIF dialog, you can specify the default delay (in our instance it will exist used for the blured frames) and disposal method. Y'all tin employ your WWW browser to check the animation, or y'all can use the animation playback function in the animation department of the image menu.

Source: https://www.gimp.org/tutorials/Simple_Animations/
Posted by: callenderrobef1979.blogspot.com
0 Response to "How To Make Animated Gif With Gimp From Video"
Post a Comment